Saturday, January 26, 2013

Fanny, Fan, and Lace

The challenge #2 is due tomorrow.  The challenge was to finish an unfinished project.
The only unfinished projects I had were:
A. corset hip padding
B.  fix my fan
C. upsize my blouse pattern and create a mockup

 The first 2 are quick little projects and the third is, for me, a huge project.

The Corset Hip Padding:

The Fan:
 I found this fan about 25 years ago.  It has beautiful carved sticks, but as you can see, one of them had been broken.  This is what I planned to fix for the challenge.


The material on the fan was in fairly good shape when I first found it, but it had a bit of wear.  In order to stabilize the fabric so I could use it I covered the fabric with a black sheer material. 


This morning I super glued the broken stick.  I haven't cleaned up the excess glue yet.

It was actually harder to do than I thought it would be because it was hard to manipulate without getting some glue on the other sticks.  I certainly didn't want them to get stuck together.

And the third project is the Blouse I've been working on.  I'm not going to have this one done by tomorrow!

I am working on the trim which has to be done before the back opening can be finished.  I'm about one third donel as of tonight.


Friday, January 25, 2013

A little faster pace!

I feel like I passed a major hurdle getting the sleeves set in.

Today I figured out the collar and attached it, hand sewed the hems in the sleeves.

Tomorrow I will start working on the trim.

I am contemplating what to do about the bodice waist hem.  The very short description on "Finishing" says to wear with fancy belt.  Well, that means I have to figure out how to make one and then do it.  It still leaves what am I going to do about the bottom of the bodice.  If I leave it so it can be worn on top of the skirt (which is what it would be if I do the belt thing then the question is:  How did you raise your arms at all without the blouse pulling up?  Maybe they didn't do such unlady-like  things as raising your arms?

Anyhow, I think I will be making a belt.  That will be a challenge in itself.

Thursday, January 24, 2013

Preparing for the next steps...

Today I had little time to work on the blouse project.  I did finish hand stitching the puff sleeve cuffs down to the lining.  I still have the tabs on the ends to finish but they will be done when I add the lace trim.

 I put bias tape around the neck opening in preparation for adding the collar.  I am going to have to create a collar pattern which ought to be loads of fun.....not.
 I finished making new patterns for the trim.
I am really not looking forward to doing the collar.  The last 2 times I did a stand up collar it didn't turn out right.  Well, I will have more time tomorrow to work on it.  It is something you don't want to be interrupted in the middle.


Wednesday, January 23, 2013

Sleeves are IN!

 This morning there was at least a hundred robins in the back yard!  And Cedar Waxwings, sparrows, etc.  They were pulling worms out of the lawn and eating the berries on the pepper tree.  Hope they ate a few snail while they were at it!
 And the spring flowers are showing their faces...........The yard is calling!  Spring is coming!  Then the rain started...time to work on the sewing project.


The sleeves are officially in.  I will be tacking down the puff sleeve section tonight and will be hemming the bottom of the sleeves tomorrow.

And I bought the lace trim!  I will have something to do for the embellishment challenge! 

Redoing the sleeves, again....and again

I started out working on adding the lace over the lower part of the sleeves.  Since I am making this out of my stash I had to figure out how I was going to be able to have enough lace to cut out these pieces.

The lace on I decided I really needed to own up to the fact the sleeves were just not fitting right in the arm hole.  The actual arm hole was just too small and the top of the sleeve lining was too small and the puff sleeve was just not setting right.  I had stewed over how I was going to fix it all since I am now pushing the limits on what material I have left.  This started out to be my mockup but somehow it is turning out that it may turn out to be my blouse.....!! 


I ended up putting in a gusset in the top of the sleeve lining and that worked for giving more room for the arm.  I cut the arm holes bigger which really helped.  And after many pinnings, and unpinnings I decided I needed to add a piece to the puff sleeve.  With all the other alterations it just needed more room around the arm at the cuff.  I managed to stick in a section of the sleeve under the arm hole so hopefully it won't really show.  Anyhow it is all pinned and ready to sew tomorrow.  I hope it still looks right tomorrow morning.

Monday, January 21, 2013

Sleeves are attached


Today I spent a lot of time working with the sleeves.  A lot of adjusting and hand sewing was involved.  There is the lining which is the full length sleeve and then there is the puff sleeve which is elbow length.  But by the end of the day the sleeves are attached to the bodice.

The puff sleeve ends in a special little cuff which is just pinned for the moment.  The rest of the lining sleeve needs to be covered.

Sunday, January 20, 2013

It's starting to get that look!

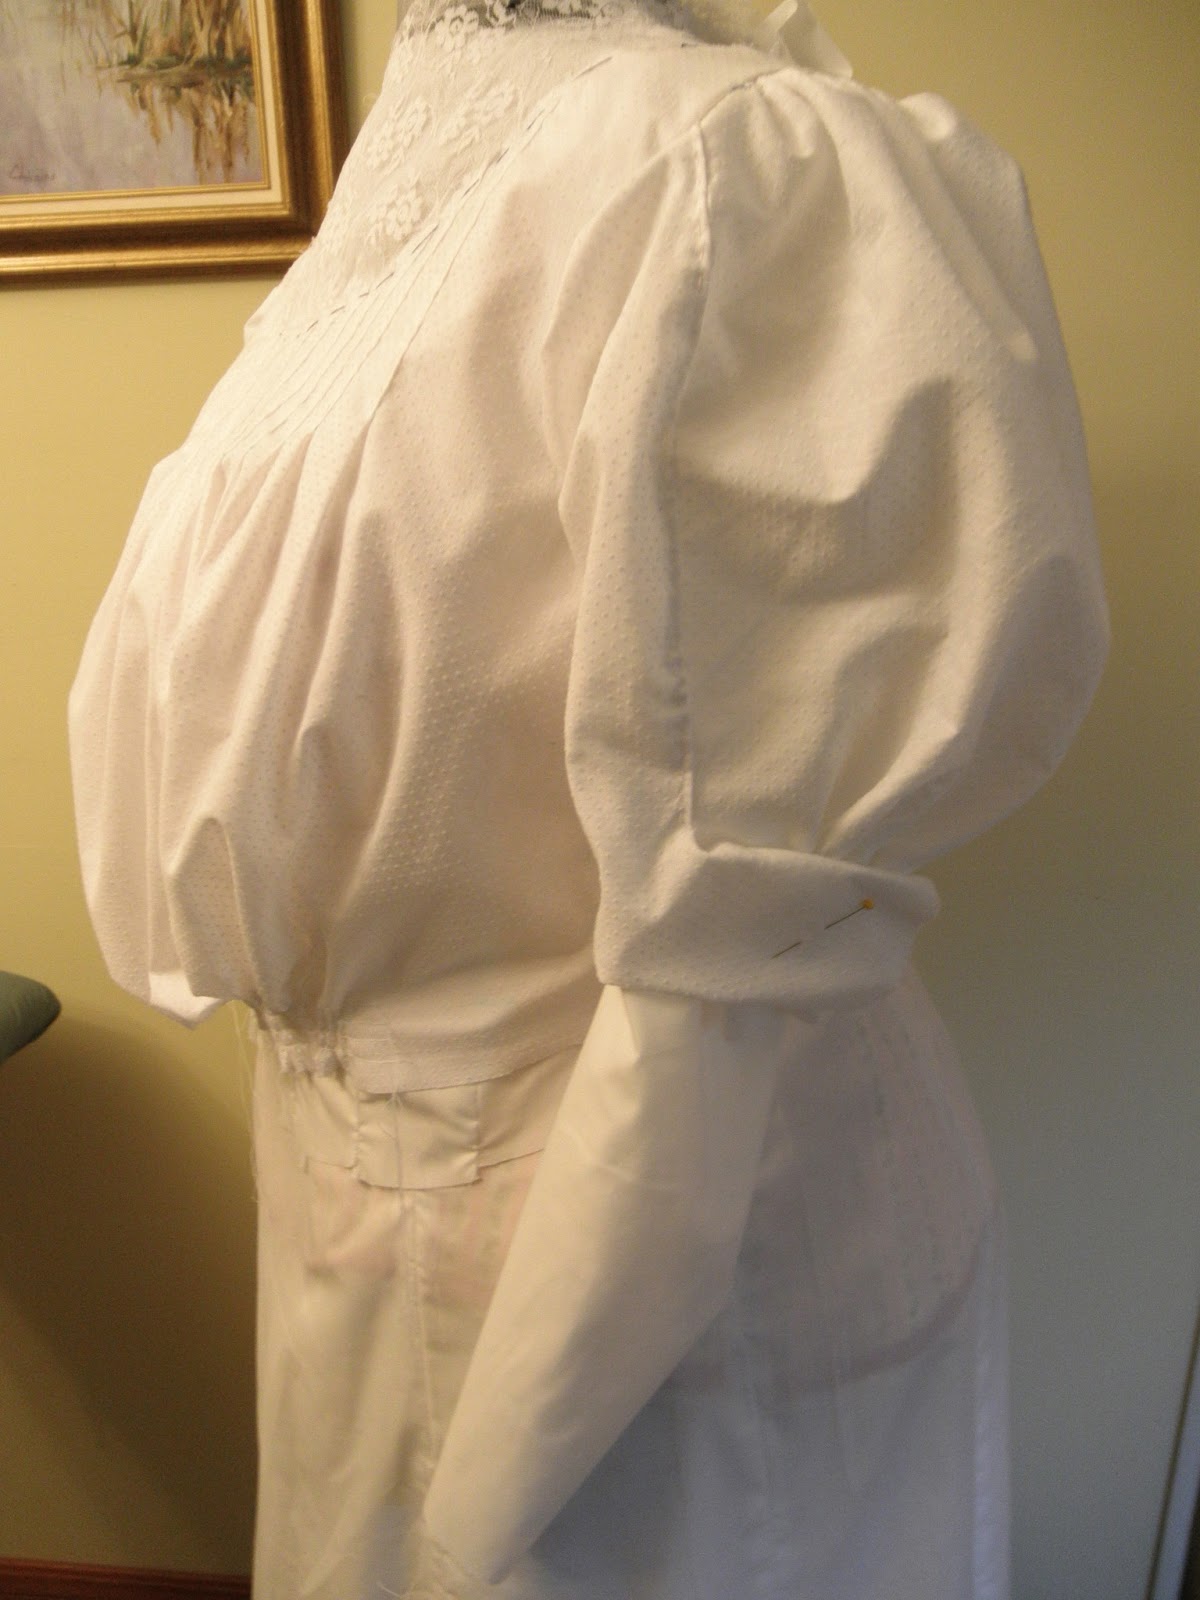
I started out just making a pattern for me from the original pattern that was several sizes smaller.  Some where along the line I just started making "the real thing".  Actually it happened that way because I just happened to have some fabric in my stash that I wouldn't mind giving up if it all didn't work.  So I am now into the outer layers!

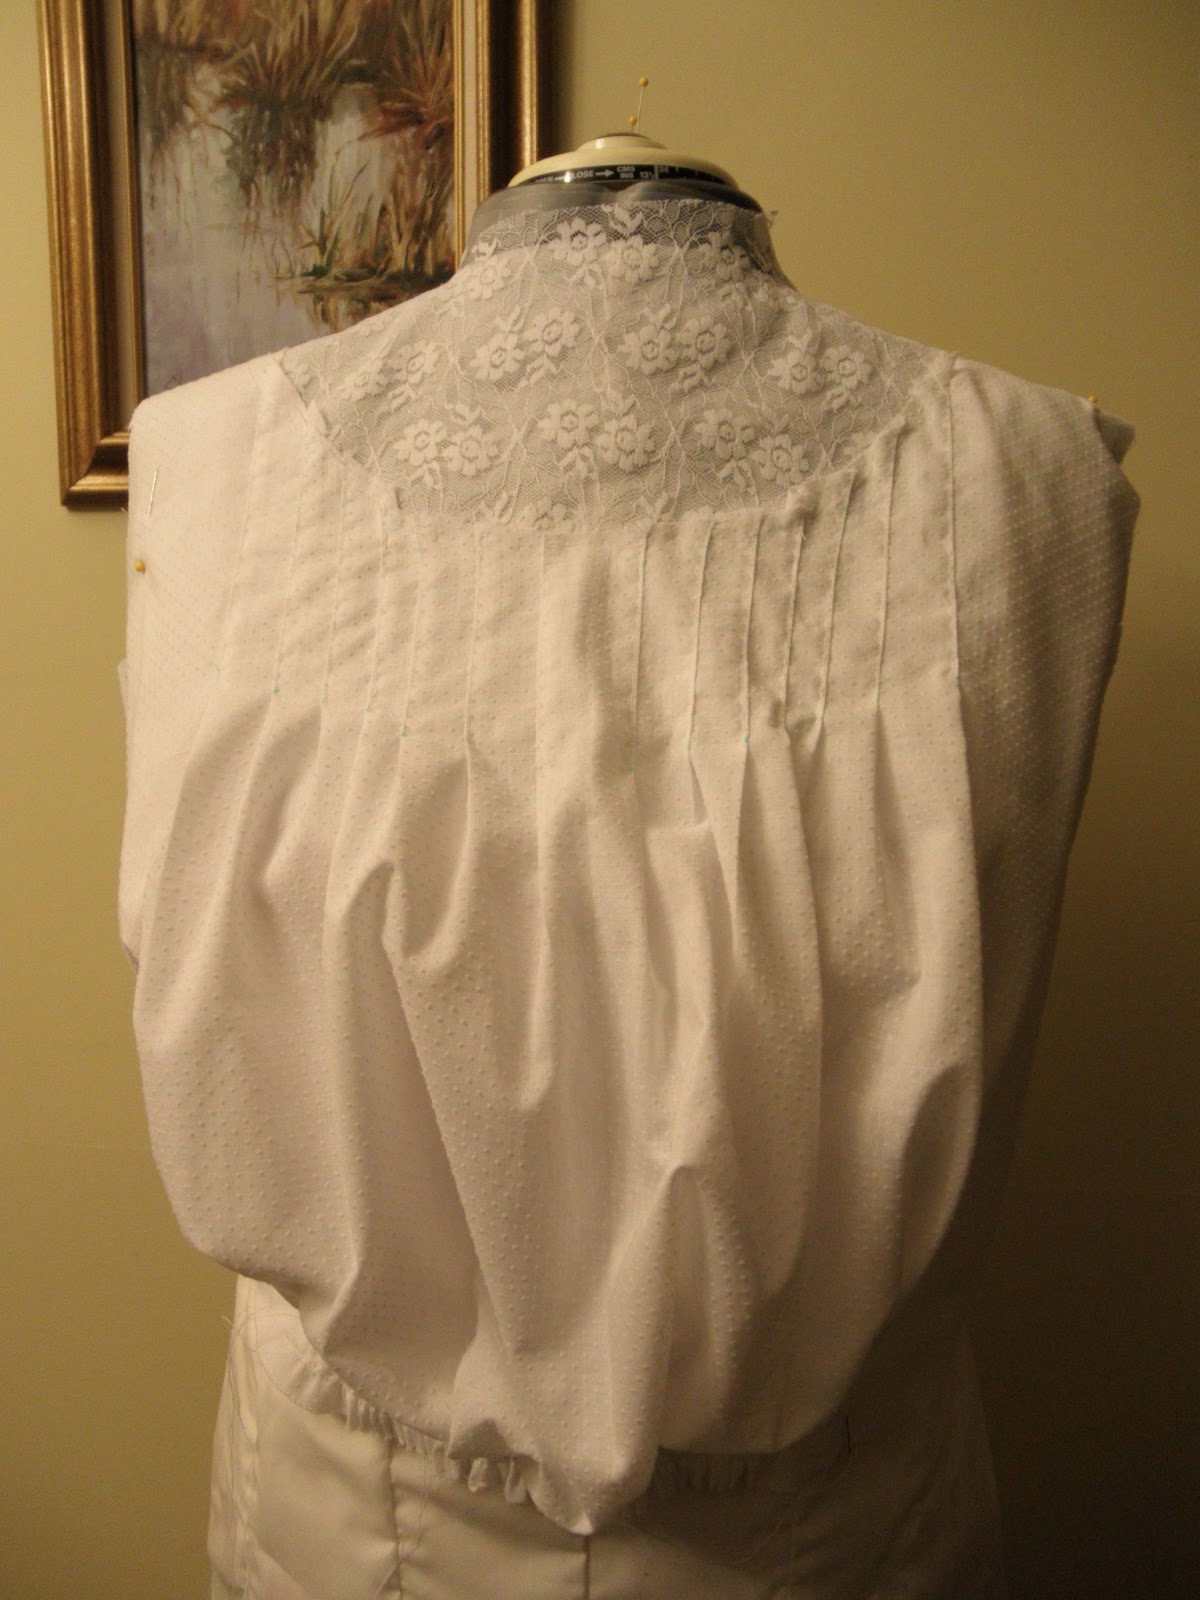
The outer "fashion fabric" layers are easier than the "foundation" bodice because it isn't as "fitted" as the foundation.  So I now have on the outer back, front and the lace yoke in the front and back.  I love it when it is all going together and (knock on wood, as they say) I haven't blown it to this point. 

FRONT
BACK
Next are the sleeves, I'll have to make a muslin pattern here for sure to make sure it is right.

Just remembered, I better do the boning now while I can still lift the outer part!  The instructions are from the original 1910 and sketchy is overstating  it.

Friday, January 18, 2013

The pattern part 2

Today I have been working on the top bodice (or fashion fabric pieces) making their patterns off of the original size 36 pieces.  So far I have the front pieces done, taking a break and then will tackle the back pieces.
This is the patttern I am currently working on.   Once I get the pattern pieces done I will start to put  the foundation bodice together with 100% cotton broadcloth.  By then the lawn I have ordered may be here and I can start the outside bodice.

And below is the new pattern that came yesterday.


Thursday, January 17, 2013

The pattern

I have made a new pattern for the Edwardian Blouse up to the bodice lining or Foundation.  Next is the top fabric bodice and sleeves.

I received another blouse pattern, this one based on 1909 but made up as modern fitting.  It also comes in many sizes so I wouldn't have to change the pattern size.

I am now waiting for the "lawn" fabric I've ordered.

Tuesday, January 15, 2013


Well, I got big and brave and started to try enlarging my new blouse pattern from size 36, the only size it comes in.  I've never really tried to do something quite like this, enlarging a whole pattern and it really had me intimidated.  But, I've started it.


I created a mockup pattern of the foundation (lining) only, so far.  All the stuff you see in the pattern picture is attached to this foundation.  I have to do this all over the corset and hopefully it will all work out!

Monday, January 14, 2013

Un Finished Object - Challenge #2 part 1

I spent some time on the corset pad project today.  I had gotten my old dress form down from the attic.  My duct tape form was made when I was not wearing the corset so it really isn't made to the corset measurements.  So I doctored up my old dress form to my size minus 3" for each measurement which according to those that know is how much your measurements change with the corset on.  Then I put the Edwardian corset on the form.

Edwardian Corset without bust pads...

And without hip pad.
It sure doesn't have the S shape at this point.

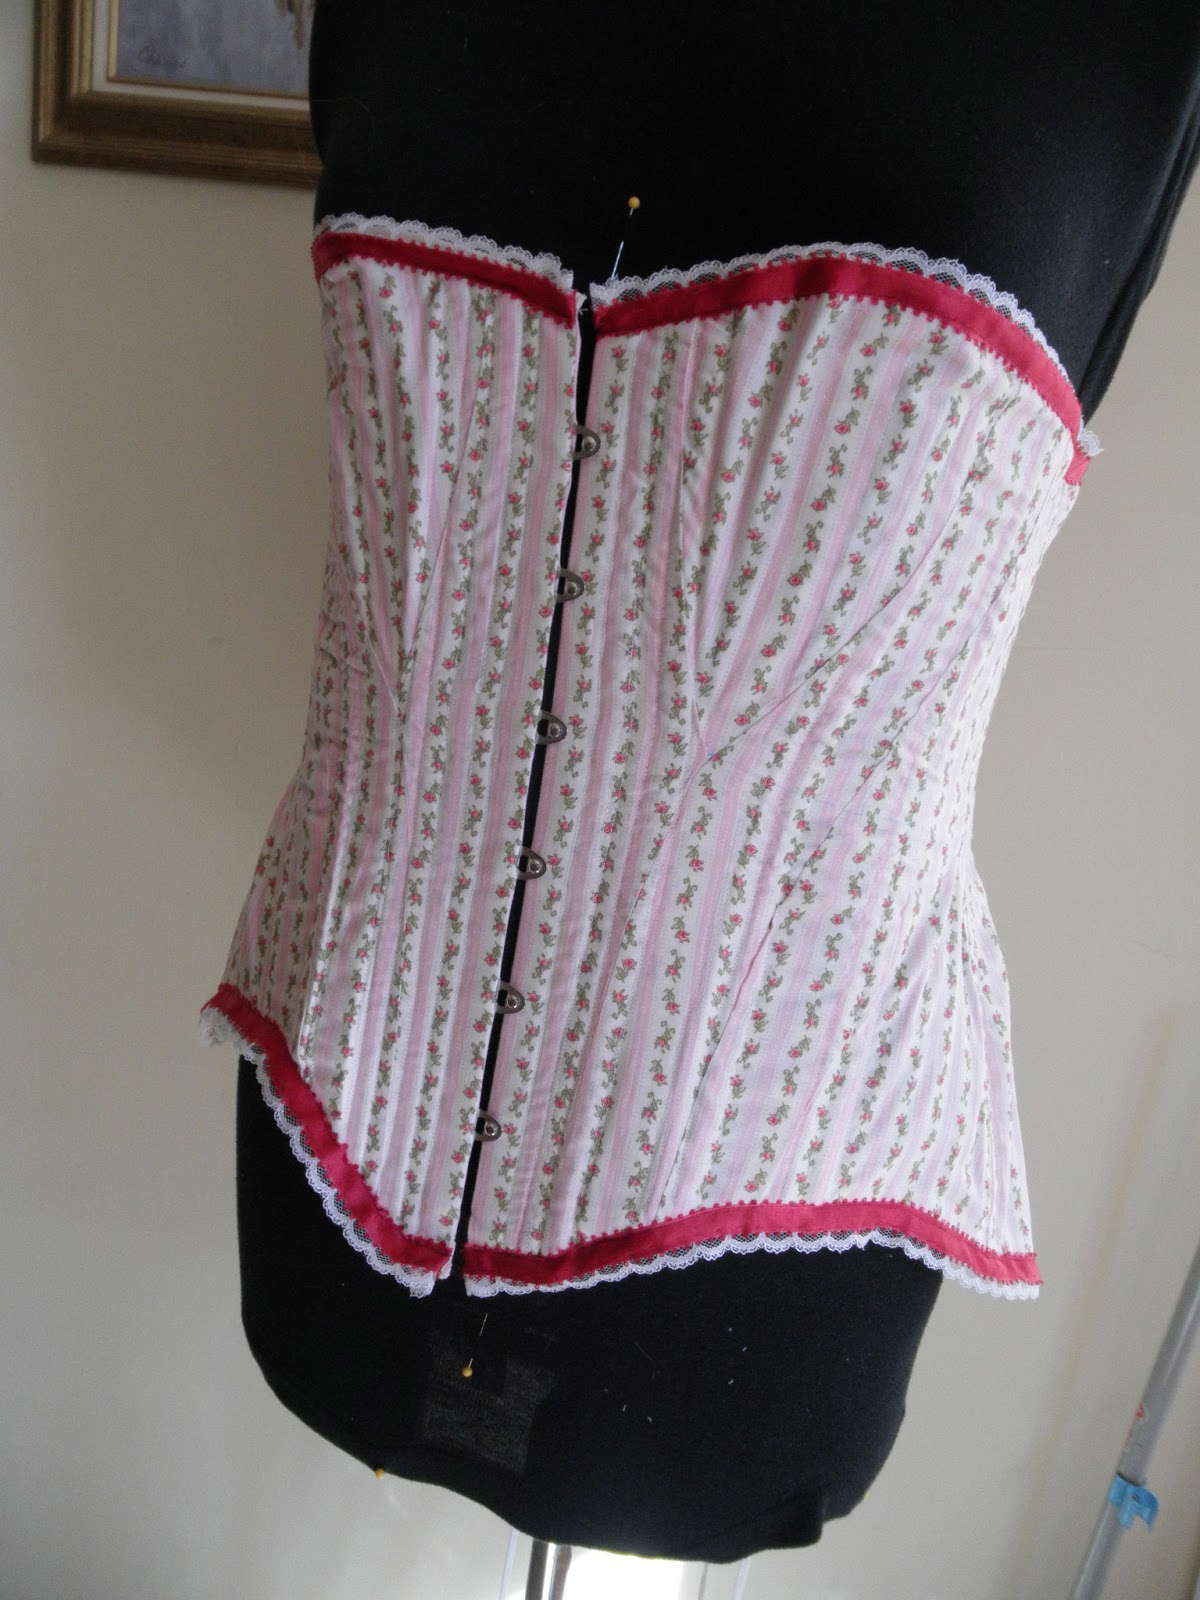
 You can see how it doesn't really have "form".  This corset is the one that gives an "S Shape".  It has padding that supports the bust because the corset does not really touch the chest area. There is a "rear pad" also.  It goes under the corset and helps create the "S" in the back.

The padding.


This is with the padding and you can see some difference.  The padding seemed to need a bit more stuffing so I rectified that problem.  


With the padding and the petticoat I can see the S form developing.  I haven't actually tried it on at this point.

I did want to document the bustle I found at a flea market in Pennsylvania about 20 years ago.  The seller did not know what it was, I thought it might be a bustle but wasn't sure.  It is made of thin metal woven into this form.  The belt is twill tape.  I rarely use it because it has several places where the wire is rusting away. 

And that's not all!

UPS just delivered 2 pieces of fabric I ordered online.  JoAnn Fabric has such a limited fabric selection.....Almost everything has polyester in it also.  This material is from Burnley and Trowbridge Co. in Williamsburg, VA. The navy lightweight wool is for a 1903 trumpet skirt and the oyster striped muslin is for that blouse for which I have yet to change the pattern.  I love both fabrics, they are much better than I hoped for!

Sunday, January 13, 2013

Starting Challenge #2

Ok, I've actually started working on the pads tonight.


The interesting thing I have learned is that the pads are how the Edwardian Ladies got the "look".  They padded the top and the bottom which made the waist look smaller.  The "rear" padding helped creats that "S" curve.

Everyone has been posting their Challenge #1 efforts and they are all great and interesting.  I have learned a lot from photos and comments from around the world.

Friday, January 11, 2013

Challenge #2 - Decision Made!

I have a couple of things I plan on doing for Challenge #2 "UFO - Finish something that's never quite gotten down.  I will be finishing my corset project. 


The Edwardian corset is now done except for the pads.

I am going to have to get the dress form out of the attic to display this project!

There are "rear" pads that go under the corset to push out the back of the corset and pull in the tummy and there there are the "bust" pads that go into the top front of the corset to fill out the top the the "S" curve of the Edwardian shape.  I haven't quite gotten myself make those pads.


A difficult project ahead!

I have a project coming up that is going to be very difficult and I am steeling myself for it.  I will be making a victorian blouse (which can be tricky enough)  but I have to increase it several sizes.  It only comes in size 36 and unfortunately I have grown up a bit since that size!  That means I have to do a muslin one to make sure my changes are correct before going "all out" and actually cutting the expensive fabric for the real thing.  So send good thoughts my way.  At least I have my duct tape "Me" to help fit it!  This project does not fit a challenge through those due by April 9, but since Ardenwood opens in April it would be nice to have finished by then.

Challenge #0 - chemise DONE
Challenge #1, the parasol DONE  and  I am getting ahead so I have extra time to work on the blouse ...It's going to take some time!

And then there is the next challenge, #2:

UFO  - due January 28, 2013
Let's get something off our UFO pile!  Use this opportunity to finish off something that's never quite gotten done, or stalled halfway through.  Can't tell you what I will be working on for this yet.....


Thursday, January 10, 2013

Exercise Day!

Today we walked after our weight watcher meeting....4 miles plus!  We earned 3 activity points, 112% towards my goal achievement for the day, 88 min regular activity and 33 min of intence activity.  We were pretty proud of ourselves!

Then I went home, ate lunch and fell  asleep in my chair.  Got up and when to see "Hyde Park on the Hudson" a movie about FDR.  Not historically correct and soooo slow.  Don't recommend it.

Wednesday, January 9, 2013

A Little Garden Time

Those weeds out there are growing like crazy.  I am going to have to take some pictures to show you.  I tried to work on the patio area and it was just too wet still.....and then we had more rain this afternoon so it will just have to start drying out again.

I did get to the baby tears area.  It was dry enough to work and pull some weeds.  The chickens loved the weedy snack.  I got about 1/4 of it done.  A lot of the volunteer Chinese Foxgloves are in great shape and will be really pretty.

I need to find a spot to put the Japanese Maple my sister, Coletta gave me.  I love it and it is dormant now so I'd better get on the ball and dig a hole before it warms up.  There is so much work out there!
I am really planning to make the side flowerbed a succulant area.  Although I need to make sure they can live through frost.  We seem to have some harder frost than we've had before and hate, and don't, cover plants.

I actually worked on part of Challenge 3 today and I haven't completely decided on what to do for Challenge 2 yet.......need to decide by Jan 15!

Monday, January 7, 2013

New Year Resolutions!


I am in the process of increasing my time on the treadmill, etc.  It would be really nice to be able to have to "take in" my new clothes by the time Ardenwood opens in April!  I'm trying!

I haven't quite decided just what to do for Challenge 2 yet.  There are several possibilities......

Sunday, January 6, 2013

Getting Ready for the Next Challenge

Challenge #1 is due January 14th and the parasol is finished ahead of time

Challenge #2 is:
"UFO - due January 28.  Let's get something off our UFO pile!  Use this opportunity to finish off something that's never quite gotten done, or stalled halfway through."

I do have a little something that needs to be finished and will be perfect for challenge 2, to be devulged January 15th.

In the meantime, I just might get out to the garden, the weeds are getting out of control out there.


Saturday, January 5, 2013

Finished with Challenge #1 - parasol


After a day and a half of hand stitching the lace, ribbon stripe, and the trim I am glad to be done with it.


Added the little finishing ruffle on the top!
And its done!

Friday, January 4, 2013

More Research on Parasols

I know the umbrella frame I have is from the turn of the century.  I thought it was around 1913 but that may be pushing it.  It is probably earlier that that.  In the 1800s parasols were part of a ladies outfit.  They always seemed to have one.  Up to 1905 it seems they were still popular but started to fade in popularity fairly quickly.

The style from 1900 changes from frilly with lots of trim to more plain but often with a stripe pattern involved.  In the fashion plates I have found of 1913 there are just a few.  One has a lace trim on the outer edge, another has a fringe of pleats. 

I had already added a lace trim on the outer edge and I added a "stripe" of floral ribbon just in a couple inches from the outer edge.  I think it would pass as transitional. 

At this point I am still hand sewing the floral strip and edgings to it.  I will add photos tomorrow. 

Thursday, January 3, 2013

Covering the Parasol


So, I cut and basted the dotted Swiss fabric.


The pieces were then fitted onto the parasol frame, adjusted.
Then machine sewn together. 

Lace was pinned on and hand sewn to cover the raw edge.  This was done before cover is attached permanently to the frame.
Of course Missy has to help pull the pins out.
The cover is on the fame but not tacked down yet.  The lace is hand sewn over the raw edges.


To be continued...

Wednesday, January 2, 2013

Regroup to go Forward!

I spent some time at Joann Fabric yesterday looking for some interesting silk fabric to cover my parasol for challenge #1.  Couldn't find any silk and the "silkies" just wouldn't cut it.  I did happen to see a brocade that I thought might work.  It has a bit of Japanese look to it, gold chrysanthemums on a white background.  I did buy a yard (50%) off but I really am not happy with it after all.  It just doesn't look like the 1913 period after all.

This the fabric I originally bought.  
 I liked the "Japanese look" because there is "history" with Clara Patterson (Ardenwood Farm) loving the Orient and visiting Japan at the turn of the century.  She has a bit of bamboo look in the stained glass windows in the guest parlor and we have a photo of her in a kimono.  But.....it just seemed too shiney and heavy and just not right.

In the meantime, I realized I really didn't know what I had in fabric and trims, so I went though all my stuff and now I am ready for future challenges!  In that process I found some dotted swiss that will work perfectly for the 1913 period.  So I'm on the road again!

The brocade will work with another parasol from  Civil War period after I stabilize some of the parts of the parasol.

So, this evening I will be working on the dotted Swiss.

Monday, December 31, 2012

Happy New Year, 2013!!! And #1 Challenge will be....

A new cover for my parasol of the period of 1913 according to the photos on the internet.  The handle and the length/type of the tip is what I used to date it.  The cover on it now is a lining material and has gotten mildew spots through the years. So, this is a good reason to redo it.  I just hope I can find material that looks like the period.

OK, JoAnn's Fabrics, tomorrow I will be visiting you!


What am I going to make for Challenge #1????

I will choose 1913 but what should I sew??


Meanwhile, garden time is coming........I have to plan what I am going to plant in the left side flowerbed.  We also will be getting a persimmon tree to replace the tree taken down in the back and probably a dogwood for the one in the front.

Sunday, December 30, 2012

Callenge #0 - 1903 Chemise

I've finished Challenge #0!
Challenge #0 was a bonus challenge and was due 31 December New Zealand Time!
Finish a project, make a very simple garment or something you have made before.


Edwardian Chemise
It is like a long slip and is the first thing you put on.  Well, maybe after the drawers....but I haven't made them yet.....
I decided the yoke needed a bit of detail so I outlined the lace flowers with pink embroidery thread.
After hand sewing all the picot ribbon I REALLY admire those that are creating HAND SEWN period garments!  Thank heavens sewing machines were invented in my era, 1890-1910.

The next challenge:  #1 Bi/Tri/Quadri/Quin/Sex/Septi/Octo/Nona/Centennial.

 Sew something from ___13, whether it be 1913, 1613, or 13BC
Due Jan 14, 2013

Wednesday, December 26, 2012

A History Sewing Challenge

OK, I came up with my project - an Edwardian chemise.  Now to get started as soon as Christmas day is done.

A Chemise was worn next to the skin and is similar to a slip.  The purpose was to protect the corset from body oils.  I had just gotten my pattern and traced it while I was at Jen and Roberts babysitting the grand-dogs.

Tuesday, December 25, 2012

Something New in the Garden Room!

I've decided to document my "historic" interests here on My Garden Room blog.

I have been a docent at the Patterson House in Ardenwood Regional Park in Fremont, CA for a long time now.  The docents are dressed in period costumes when giving tours to the public.

We need a new infusion of knowledge and creativity towards our period costumes.  Our training has been lacking a bit for the past few years.  So I hope to inspire with more research and sewing on my part so hopefully we can bring forth a new level in period dress (1890-1910).

I used to make a new outfit every year but haven't been able to do that for several years and now I intend to start that up again.  In researching I came across " http://thedreamstress.com/the-historical-sew-fortnightly/ ".  Leimomi Oakes is the Dreamstress, a textile historian, seamstress, designer, speaker and museum professional. When I landed on her site she just happened to start a year (2013) of 2-week challenges of historical sewing projects!  Boy, was that good timing!  I had just ordered 3 new patterns and had used some of the days I was dogsitting our grand-dogs at Jen and Roberts to trace all the patterns to my size.  So I am ready to go!

The First Challenges:
  • #0 (the bonus challenge): Starting Simple - due 31 December NZT.  Finish a project, make a very simple garment, or something you have made before.
  •  
  • #1: Bi/Tri/Quadri/Quin/Sex/Septi/Octo/Nona/Centennial – due 14 Jan.  Sew something from __13, whether it be 1913, 1613, or 13BC
  •  
  • #2: UFO - due Jan 28.  Let’s get something off our UFO pile! Use this opportunity to finish off something that’s never quite gotten done, or stalled halfway through.
  •  
  • #3: Under it all – due Feb 11.  Every great historical outfit starts with the right undergarments, and, just in time for Valentines day, here’s you’re excuse to make them. Chemises, corsets, 
  • corded petticoats, drawers, garters, stockings…if it goes under your garments, it qualifies.
  •  
  • #4: Embellish –  due Feb 25.  Decorations make the historical garment glorious. Whether you use embroidery, trim, pleating, lace, buttons, bows, applique, quilting, jewels, fringe, or any other form of embellishment, this challenge is all about decorative detail.
  •  
  • #5: Peasants & Pioneers – due March 11. As wonderful as making pretty, pretty princess dresses is, the vast majority of people have always been poor commoners, whether they were peasants working the land, servants in big houses, or (later), pioneers carving their own space in new lands. This fortnight let’s make something that celebrates the common man.
  •  
  • #6: Stripes - due March 25. The stripe is one of the oldest patterns, appearing in the earliest textile fragments and visual records of garments, and its never gone out of style since. Celebrate stripes with a striped garment. Will you go for grand baroque stripes, pastel rococo stripes, severe neoclassical stripes, elaborately pleated and bustled Victorian stripes, or something else entirely?
  •  
  • #7: Accessorize – due April 9.  Accessories add polish to your outfits, helping to create the perfect historical look. This week is all about bringing an outfit together. Trim a bonnet, paint a fan, crochet an evening bag, sew a shawl, or dye and decorate a pair of shoes to create the perfect period accessory for yourself.

Merry Christmas!

What a wonderful day!  A great time with family!  I always panic a bit about not having enough food but always have enough.

The kids loved all their presents, especially Tim loved his camera! 

We are happily tired, the house is cleaned up and we are ready to finish the movie we started last night.

Merry Christmas!!

Sunday, December 23, 2012

A New Year and New Resolutions!

Got back from our big 40 day trip across country in July, 2012 so a lot of catch up has had to be done.  We had been putting off several house repairs so:  the house was termite tented, painted, the broken roof tiles were repaired and two very big trees were removed and others trimmed.  The yards have a different look now and garden planning will be beginning right after Christmas.

Santa has brought gift certificates to our favorite garden nursery, Annie's Annuals.  That means a trip for plants will be planned for the spring!  I will have to look up when their spring sale is!!!

Meanwhile, I am adding my sewing projects to this blog as well as the garden projects.  I have been a docent at Ardenwood Historic Farm for over 20 years now.  I used to make up a new outfit every year but have not been able to the last few years.  So, this year I decided to get with it and do some sewing as my winter projects.  I have just found "The Dreamstress.com", a historical sewing website and have joined the challenge of sewing a new project every 2 weeks during 2013.  Hope I can keep up!

Ardenwood's time period is from 1890's to 1910ish.  I just traced 3 new "old" patterns to make.  So here we go!