This is the Back Flowerbed a couple of months ago. I had finished digging in chicken manure in 2/3 of the flower bed. The background of the photo shows I still hadn't taken out all the penstemon. That was taken out and manure was added to the soil.
At this point, I had already planted my Lion's Tail (the orange in the center) and the silver dust (the white mound in the foreground and center right).
And look at it now!
I had not expected all my new little babies to bloom before spring so what a joy it has been as most of them have decided to have flowers for me already!
The only ones that haven't boomed are Aquilegia fragrant columbine and Ursinia anthemoides "Solar Fire".
Here are some in bloom now:
Tuesday, September 28, 2010
Monday, September 27, 2010
Sunday, September 26, 2010
Changing seasons
It is beginning seem like forever since I've painted......The garden is looking like it will be ready for Winter and I am so looking forward to Spring! One more flowerbed to go and then the big patio area. We are starting to get caught up with the trash cans of cuttings. Our neighbor has been letting us use theirs too which is really helping. Currently we are 6 cans to go. Every week I do manage to fill one though. The pick up can holds 1.5 of our smaller cans so eventually......
We are currently experiencing another heat wave. Thank heavens they don't last long. We have about 2 more days of this. It is probably the last of the season. We usually get our first rain the week of Halloween and it is usually starting to get nippy in the evenings too. Good for the kids in their costumes....Unless they are a ballerina or something like that.
Saturday, September 25, 2010
Done with the big changes in the Little Secret Garden Room
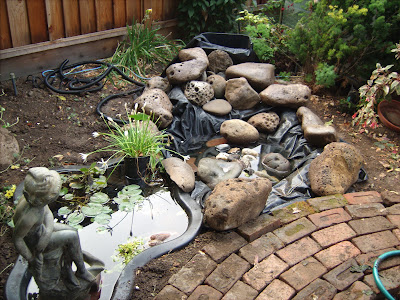
The waterfall! Once the plants fill in the back area this area wil be finished.
Considering I worked with rock and stone we already had, I think it turned out well.
The patio is tightened up. It is still a small space but bigger than the old patio. We had lunch out there this afternoon and it was a very restful, serene place.
I have a few plants to plant in the planter. And Oct. 2, we are heading to Annie's Annuals and there will be more to plant when we get home. I am making a list and checking it twice!
The squirrels are still having fun!
The squirrels have REALLY enjoyed the sunflowers this year! If I would have known this secret to keeping them from eating our tomatoes I would have been planting sunflowers for years.
I just planted them this year as a whim, to have something covering a bit of the fence. I planted them just before we left in the first week of June on our "Slice of America" trip. It was just a surprise to me when we returned a month later that the squirrels hadn't been attacking even the green tomatoes like they usually had done every year. Instead, they were having a good old time jumping and frolicking up and down in the sunflowers! Then the sunflowers were ripening and they started tearing off the flower pod and depositing them all along the top of the fences. Finally the wind blows them off after they have eaten all the seeds. Meanwhile, the sunflowers look pretty mangled.
This is a section of the squirrels pantry.
Thursday, September 23, 2010
Wednesday, September 22, 2010
Take 3
This morning I redid some of the stones, and added some more of the flagstone and the small stones. There are still more small stones to add but I am basically happy the way it is. When the plants are planted and grown I think it will look fine. Now to decide on the plants and then to get them.
In the meantime, I have to finish the patio area and around the patio
Tuesday, September 21, 2010
Take 2
Ok, take 2. Saturday, I lowered the waterfall, redid the rocks (putting the biggest on the sides), and added some flagstone (because I ran out of original round sandstone rocks). The color of the 2 kinds of rock are similar so surprisingly it doesn't look bad. The flagstone adds interesting water flow. I added some more medium size rocks. There is still more flagstone to add and also medium and small rocks before being done. I am worried a bit about how to hide the actual waterfall reservoir. I am thinking I can put some flagstone around it, we will see.
Haven't been able to work on the project since then so tomorrow will get something done.
I have also been looking into what kind of plants to put at the back the the water features. Reagan's Nursery had a sale of 30% off on water plants last weekend...I wonder if it still on, may check on it tomorrow.
Saturday, September 18, 2010
Dirt and Rocks!!!!
I dug a hole to house the pump for my pondless waterfall. Thank heavens it wasn't rocky in that area.
Then I realized what I really already knew...The pond just had to be moved to a more prominent spot. So, I dug a hole for the new location for the pond. I was thankful it is a small pond and not real deep. It was a little harder to dig out because it was where the old nectarine tree had been so there were quite of few roots to cut.
Great, I got the pond level and everything works
Then I did a first take on the waterfall. I know it is going to take several tries before I am happy with the laying of the rocks for the waterfall. This try showed me that I am going to have to be creative with rock. For all the rock I have, it is not quite enough. I had to use most of the middle size rocks around the pump area. I have quite a bit of the next size down and then there is the pea-gravel size.
The two big ones in the front certainly need to be moved. I am going to try some flat sandstone for the actual waterfall area. Hope it looks ok with all the rounded sand stone rocks.
I have to take a couple of days off though....the body needs to recover from moving all the rocks yesterday! I feel every bit the senior citizen this morning! The house needs cleaning and then as I take breaks to rest the aches and pains I will be researching plants for my pond area. We are headed to Annie's Annuals Oct 2nd. I'm saving my allowance!!
Thursday, September 16, 2010
Laying the Patio in the Little Garden Room
The other day I laid the blocks for the planter box on the back side of the greenhouse and filled it with compost.
All the compost of weeds and branches that had been in the hole from the old pond was removed. I finished filling the hole with dirt from the garden. I had to remove big rocks that had formed a path next to the pond. Then I filled those holes in and leveled the whole thing.
Then I moved the bricks from the patio on the other end to form the new patio area.
I am not finished with the patio but need to go on to next steps so all will fit together. This photo shows the new planter box and patio. Some of the rocks are sitting back there at the edge of the patio.
This is the same area from the opposite direction. In the background is where I took the bricks from.
From that far end today I laid out where the new path will go.
Another view of the area I took the bricks from. See, more rocks! You can see my "little girl", the statue near the chair. She is part of a fountain at my tiny pond. I went to home depot to see if they had a spillway for a waterfall to try to improve how she is sitting in the pond.....unfortunately they didn't have any that would work .......BUT, they had this "pondless waterfall kit in this dilapidated, torn box for $30. A real bargain so, I bought it after checking if everything was there. Couldn't resist. I love water in the garden. Now to figure out how to put it in so it looks ok. Those blocks in the shade of the closed umbrella are my props to figure out how and where I am going to locate it. And what am I going to do with those rocks. They are sandstone with "bubble holes" in them, mostly roundish and not very distinguished.
After I get this all in, then the plant selection begins. This area gets partial sun and is usually pretty hot.
Tuesday, September 14, 2010
Working on the Garden Room
The blocks on the bottom of the photo is where a pond was a year ago. The pond liner developed a leak and it was taken out. Instead of just leaving a hole there I used it as a compost container. I filled it with leaves and greenery. I have decided to change things so...
I had to remove the compost because I have decided to move my little patio in the Garden Room to this spot. I filled the hole with 10 wagon loads of dirt from the garden.
Here the hole is filled with dirt and the garden blocks on the left are laid out for a planter box I am going to use for tuberous begonias. There are a large stones on the right side that were a path. I will be moving them to the other side of the Garden Room. From that side........
This is the other part of the Garden Room. The brick patio there will be moved to where the old pond used to be. The stepping stones, literally stepping rocks will be moved over here.
Just an update on the Back Flowerbed...
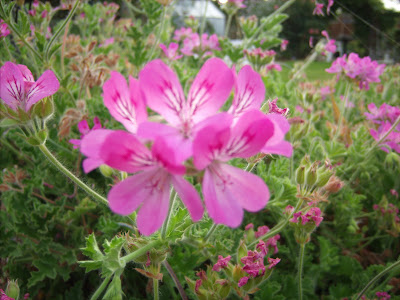
And thought I would just throw in a photo of the geraniums in the patio flowerbed.
Sunday, September 12, 2010
Shakespeare Festival, Day 2
Saturday, September 11, 2010
No Gardening! Shakespeare Festival Days!
Care to joust anyone!
Shakespeare Festival at Ardenwood today! Lots of fun! I had forgotten my earrings today so I bought some while in the Shakespeare village. There were so many vendors and players I saw only about half of them. Later I was stationed in the Patterson House Guest Bedroom for 2 hours of flow-through tours.
It will be a repeat performance tomorrow. I plan to bring the credit card!
Here comes the Queen!
Friday, September 10, 2010
The Small Garden Room
What I am going to do about my little garden room. It is a small area and is a little crowded right now. I did have a medium sized pond that developed a crack so I pulled out the liner and have been slowly filling in the hole with dirt.
The pond below is no longer there.
This part of the area is a small patio and a small pond.
I am thinking of creating a tuberous begonia display in part of the area where the larger pond was and taking out the patio near the small pond and creating one near the tuberous begonia.
The pond below is no longer there.
This part of the area is a small patio and a small pond.
I am thinking of creating a tuberous begonia display in part of the area where the larger pond was and taking out the patio near the small pond and creating one near the tuberous begonia.
The Weed War has begun!
Those little weed buggers are popping up! And in the Baby Tears area about 50 nasturtiums popped up overnight and they already were a couple inches high in a day. Well, that bunch is gone but I am expecting to be kept busy for awhile. I would love to let them grow but they get loaded with thousands of these ucky black aphids that leave a black soot on everything besides ruining the nasturtiums. So, that's it with the nasturtiums. The Baby Tear area also has lots of baby tears that I am letting grow back after they had been burned back from the June hot spell.
And looky here! One of the baby poppies I just planted decided to bloom! This is a California Poppy "Red". Makes my heart beat faster!!
I am exhuasted
After all that work of digging and pulling to get those volunteer agapanthus and volunteer plants out of the planter box yesterday my arms and legs really don't feel like doing anything today.
I did go out and turn the 2 compost piles. I also put little fences around the Olive Tree area because Joe, our old aussie, is in the start of the "apple season" in which he picks off apples and buries them all over the yard. He has been trying to use the nice loose dirt in the flowerbeds, right where a brand new plant has been planted. That did it! Up go the fences until the plants can defend themselves on their own!
Thursday, September 9, 2010
Planter Box area is cleared!
All the overgrowth is gone from the Planter Box.
The Olive Tree area is all planted.
And the back flower bed is planted. The red flower is one of the new alonsoa's I got from Annies to go with my apricot alonsoa.
Another view of the Back Flowerbed.
This "Leonidas" rose bush never really lived up to my expectations, but it was experimental when I bought it so it was iffy. It was supposed to be a real coppery color, but it never really did well, let alone give me the color I was looking for. But for some reason this year it decided to really start perking up and although the color is getting closer it still is more orange than copper. But it does look really pretty this year....don't ask my why!!
Now, the next area to work is the Side Flowerbed. Currently the 4 o'clocks think they own the place and have reseeded to rediculousness the past few years. I have started to cut them out now that they are done blooming for this year. Time for them to know their place!
Wednesday, September 8, 2010
Where have all the snails gone?
Normally we are constantly battling snails. We go out in the summer time at evening and do snail picking as they cross the paths to get to our plants. This spring we would find a few in the building block holes in the blocks along the veggie beds. I would feed them to our turtle, Housie. But since June, I have found about 10 at the most! Where did they go? --Not that I want them back, especially with all my baby plants I have just added to the garden.
Skunk Proofing the yard
After years of having skunks visiting our yard and spraying our dogs we finally figured a way to skunk proof the back yard. The skunks would dig under the fences and the dogs would get sprayed. We would put a bunch of bricks and building blocks in the holes and they would just push them aside the the next night. We would be doing middle of the night doggie baths with tomato juice or "Skunk Off". They would still stink months later when they would get wet.
A neighbor gave us some house siding made of fiber/cement 10" wide about .5" thick. We slid the boards under the kick board, half on our side, half on the neighbor's side. The skunks would try to dig under the fence but would hit the boards. They would not try to dig 5" back from the fence and go under the board.
The only time we have had a skunk since was when there was a spot they could crawl under the gate. That has now been fixed. We put a row of bricks a little higher than the gate. No skunky visitors!
They did try though! Here in the hinge corner of the garden gate a skunk had tried to dig through but the brick up against the gate kept it out even though it dug down about 5 inches.
Subscribe to:
Posts (Atom)