Sunday, March 31, 2013

Hat- part 4

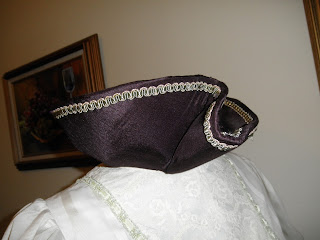
Last night I pinned what I think I want to do to embellish my new hat.

I took strips of the shantung fabric I covered the hat with.  I sewed the edges together and turned it inside out leaving the shiny side out.  I added some netting inside the strip to give it more stiffness so I could play with the shape.
I threaded the "ribbon strip" through the belt buckle and put it at the front while weaving the rest of the strip around with some netting.

I decided to add some interest at the back by bringing the "ribbon" down into the edge of the hat top.


Oh, I had added a strip of fancy braid to the side edge of the hat top.

 This netting, I can't remember the name of it, has a little design in it.

So now I have an idea of what I want to do so I will take it all apart.

Next step, add a couple bands to the hat top side to cover all the basting stitches from attaching the brim to the top.

For now I am off to do some painting with friends and the hat will wait until this evening.....I still have something to add to the embellishment!!


Saturday, March 30, 2013

Hat - Part 3

Well, we are at step 19:  The fun part!  Embellish.  Figure out how you are going to decorate the hat.  If you hand stitch you can later remove decorations and re-do your embellishment, voila! a new hat!

You can add all kinds of stuff, depending on the era.  Bring out fancy belt buckles, old jewelry, maybe pearls, silk flowers, lace netting ribbon, birds, or just feathers.......

Bring out the little pieces of fancy cording, lace.....

You can do just the top of the brim or bottom too.
 I know, we haven't finished the lining of the hat top.  Some of your embellishment may require finishing it after the embellishment so figure if that is true for your hat.  By the way, the bands around the top sides on the outside will be one of the last steps.

 Old jewelry like this brooch can be added.

Grandma Eberly's brooch given to her by her daughter, Edna.


Here are some other hats I've made to maybe give you some ideas.

I had totally forgotten I had this hat, now I have a skirt to go with it!


Side view:  I need to trim that ribbon in the front!


I made this green hat years ago and get lots of compliments on it.  It is rather simple with 2 peacock feathers and a pulled up and folded brim.  Ardenwood had peacocks over a hundred years ago so the peacock feathers honor them and the ones we have on the farm today.


My daughter gave me this hat.....And now I can wear it with my new skirt too.


This was my first hat I made.  The brim is really flat with no padding, I added netting on top to give it some dimension.  The feathers are egret feather, common birds around the San Francisco bay.  I found these feathers in the grass on a walk one day......I guess the egret was hot that day and took his feathers off.  Well, I like to think that is what happened.  The egret was close to extinction in the Victorian era because so many were killed just for the beautiful male mating feathers to decorate all those hats.  Lucky for us we have plenty of egrets now.


I made this one quite a few years ago too.  I had a copper colored dress and it went very nicely with it.  It too has too thin of a brim and if I was to do over would pad it on both sides with felt.  I would also maybe put some netting under the crushed velvet to lift up the folds a bit.  The feathers were given to me by my son-in-law honoring one of the pheasants he got. 


Side view.


It takes a lot of guts for me to wear this one......reminds me of something the dowager in Downton Abbey would wear.... But it is hard for me to carry it off.  It seems so BIG and HIGH.  And SO overdone with the stuff on top. But, people love to see it and compliment me on it.  I think it is because it is different shape and almost all our hats are the same shape... Well, not much is handmade nowdays.


This one I started last year and haven't quite finished.  It takes after the green one above but needs it's big button added to the fold and maybe a couple ostrich feathers.


It will take a bit for me to think about just what I want to do for my new hat.  I think I will take my shantung that I made the body of and use the back or shiny side for some ribbon-like embellishment.

Friday, March 29, 2013

Real Victorian Hat & Reproduction

I want to tell you I am no expert in hat making, but I have attended a one day class many years ago when I first started as a docent at Ardenwood, a historical park in Fremont, CA.  We had to come up with our own historical outfits, including hats.  That was before "internet" and there were not a lot of resources for the every day person to learn how to reproduce the authentic "look".  Mostly we had the movies to look to for closeup details and I must say most movies were pretty bad at their "look".

The Internet is invaluable for all its information and contacts with others with the same interests.  If you are interested in hats this is a site that has this wonderful tutorial:
 http://thedreamstress.com/2013/03/tutorial-how-to-turn-a-straw-sunhat-into-an-18th-century-bergere/

TheDreamstress.com is where I found the challenges I have been doing.  A whole group of people with interest of reproducing historical clothing (in all eras) has gathered together in these challenges.

With that said, yesterday was so busy I really did not have time to work on the hat I am currently making so I thought I would share the Victorian hat I found about 25 years ago at a flea market.  The hat is made of black velvet on a base of buckram with wire around the hat top edge and brim edge.  It has a polished cotton inside the hat top, straw for filler, and 2 buckles and ostrich feathers for decoration.  It is now in need for some restoration because some of the threads are now letting go.  So, that is a good time to try to see where we would not normally be able to see.  The velvet is in great shape but the top ostrich feather has a little wear that a drop of black paint may fix.


This is the Victorian hat.  You can see all the folds of what looks like loose velvet on the brim of the hat


 On the hat top you can see layers of the velvet circling the sides.


 And in the front is this pretty little buckle with a bit of velvet through it.


 As we circle the hat you can see there are velvet bow-like loops that cover the ends of the feathers.

There are 3 full ostrich feathers and at the top end of them is this large buckle holding a puff of the velvet.


 As we continue around you can see more of the "loose" velvet folds.  Actually the velvet is tacked down here and there.  The hat pin did not come with the hat but I leave it in the hat so I don't have to pierce the velvet every time I wear it.

 Now going underneath the brim, see all the folds along the brim.  These go all the way around but are larger near the front which is at the bottom of the photo.  They are actually just strips of velvet hand baisted together.  These threads are starting to break so I will be replacing them. 


This view shows the hat top with the white buckram showing, the polished cotton lining, and the side "flap" where the lining meets the brim.  The two light spots on each side of the flap are pieces of a light blue silk that was a piece of silk formed into a loose flower.  The silk was so shattered I just removed it .  I use this flap to pin the hat to my hair to stabilize it.  I intend to try to reproduce the silk flower.


And then, a little peek inside...... 

The brim layers of velvet strips separating.  Buckram showing inside.

Little pieces of straw showing.  It was used to puff up the velvet a bit.
Buckram and straw showing.

And this is my reproduction of sorts of the Victorian hat:

The front- I used green velvet and peacock feathers.  The buckle is just from the fabric store.
The back - the "loose" folds and a pin with charms instead of a 2nd buckle.
The folds of velvet strips at the brim edge.
And the lining with buckram showing?????  Not buckram, a child's plastic woven Easter hat I used for the hat top.  I did use buckram for the brim.

And the "flap".  I use this for pinning the hat with bobby pins to my hair.  They don't show.


Hope you enjoyed seeing the Victorian hat.  I feel it is really special and often think about the woman hat maker that made it.  I sure would have loved to visit her hat shop!


Thursday, March 28, 2013

Hat, Part 2

I was attaching the brim to the hat top the other day and we ended with step 12.

Step 13. Cover the brim top with the fashion fabric, basting it down.


Step 14.  Fit, pin and stitch the brim to the hat top. 


The stitches on the hat top will show but will be covered later.


 15. Add Fashion fabric to the bottom of the brim stretching in shape, pinning and then basting.


16.  Trim Fashion fabric at edge. 


17.  Cut on the bias a piece of fashion fabric long enough to cover the brim outside edge plus a couple inches.  This piece should be about 1.5 inches but it does depend somewhat on how thick your brim wire and felt are.

18. Sew bias piece over out side edge of brim covering edges of top and bottom fashion fabric.


This is where I am at so far, so to be continued

This is what the inside top looks like at this point.

And the outside looks like this.

Tuesday, March 26, 2013

Challenge #7 - My Project, a Hat

Challenge #7

I'm going to make a hat.  I have several hats but they are all dark, I need a new light, airy turn of the century.  Now, for style........I have an idea what I want but we will see how it turns out.

 I have buckram and wire already to here we go:


1.  2 cut layers of buckram steamed together are cut to hat top size, front and back are marked.
2.  Covered wire is stiched around the hat top edge.
3.  Hat sides are stiched to top.
4. Felt is added to the top and sides.


4.  Fashion fabric is added to top and sides.


5. Cut out your brim.
6.  Outline your hat top onto your brim.  Remember you marked the front and back on your top.  Now mark it on the brim too.  Where do you want to place your outline?  It doesn't have to be in the center!
7.  Cut out about 3/4 in from your outline.  and cut notches in toward the outline


I just had to add this photo.  Missy was really put off by me just taking pictures and not lovey-doveying her.

8.  Now what is your brim going to be like?  Flat, high curves, high on one side, down on the other?  Where you want a curve in the brim edge, slash and overlap the edges to make the curve.  Decide which way the curve is to go, up or down and pin.  How deep you slash and how many slashes determine how much of a curve and how smooth of a curve.  I would use a somewhat stiff paper to make a mock up.  You can vary deep slashes with short slashes for really high curvy brims.


9.  Sew the overlapped slashes closed.

11.  Pin the brim to the top.  If the brim hole is too big you can cut it from the outside to the hole (preferably at the back)  and overlap it to fit the top.


12. Un-pin the brim and cover the brim with felt starting with the side that will show the most, overlapping the brim edge and baste it down. 


To be continued: